Setting Up a Secure Guest Network Configuration on Your Router
Are you looking to provide internet access to visitors while keeping your main network secure? Look no further! In this article, we will guide you through the process of setting up a guest network configuration on your router. This will enable you to create a separate wireless network for your guests to use, while preventing them from accessing your main network.The Benefits of a Guest Network
A guest network is a great way to provide internet access to visitors without compromising the security of your main network. By setting up a guest network, you can: * Keep your main network secure from unauthorized access * Prevent guests from accessing sensitive data and devices on your main network * Provide a separate network for your guests to use, without compromising the performance of your main networkStep-by-Step Guide to Setting Up a Guest Network
- Log in to your router: The first step is to access your router's web-based interface. This can usually be done by typing the IP address of your router in a web browser.
- Navigate to the guest network settings: Once you have accessed your router's web-based interface, navigate to the guest network settings. The location of this setting will vary depending on your router model and manufacturer.
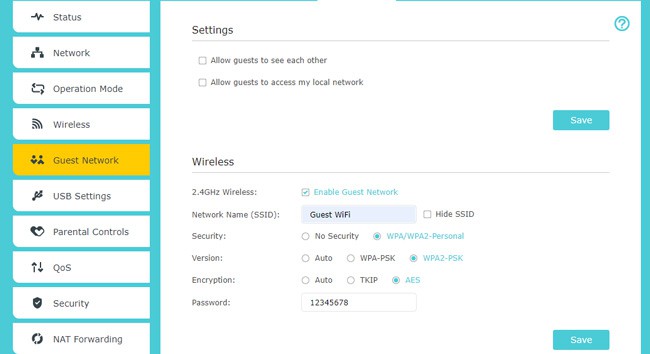
- Enable the guest network: Enable the guest network by ticking the box next to "Enable Guest Network".
- Configure the SSID: Set the SSID (wireless network name) for your guest network. You can choose a name that is different from your main network.
- Set the password: Set a password for your guest network. This will be the password that your guests will use to access the network.
- Configure other settings: You can configure other settings such as the network channel and encryption type for your guest network.


")
![[Wireless Router] How to set up Guest Network on ASUS Router?](https://static.tp-link.com/upload/faq/image_20250925094838f.png "[Wireless Router] How to set up Guest Network on ASUS Router?")


![How to Set Up a Guest WiFi Network [Step-by-Step Guide] - Reolink](https://60a99bedadae98078522-a9b6cded92292ef3bace063619038eb1.ssl.cf2.rackcdn.com/images_TechSupportArticlePix_8194Image3.jpg "How to Set Up a Guest WiFi Network [Step-by-Step Guide] - Reolink")


:max_bytes(150000):strip_icc()/001-guest-network-for-home-tutorial-818204-37a2774c65c945c69093d0c18262042c.jpg "192.168.1.1 Login - Access Your Router Admin Page")


 On Amazon")


![[Wireless Router] How do I enter my ASUS router's setting page using ...](https://askanydifference.com/wp-content/uploads/2025/06/step-by-step-guide-to-activating-a-guest-network.jpeg "[Wireless Router] How do I enter my ASUS router's setting page using ...")