GHz Router DNS Server Configuration: A Comprehensive Guide
Domain Name System (DNS) is a crucial component of your internet experience, ensuring that you can access websites and online resources seamlessly. However, configuring DNS settings on your GHz router can be a daunting task, especially if you're new to networking. In this article, we'll provide you with a step-by-step guide on how to configure DNS settings on your GHz router, ensuring a faster and more secure browsing experience.
Understanding DNS Server Configuration
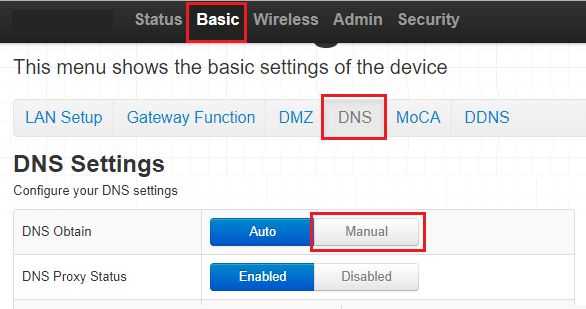
Before we dive into the configuration process, it's essential to understand what DNS servers are and how they work. DNS servers translate domain names into IP addresses, allowing your devices to communicate and access the internet. Most ISPs automatically assign DNS server addresses to your router. However, you can manually assign static DNS server addresses if your device requires specific ones.
Why Configure DNS Server Settings on Your Router?
Configuring DNS server settings on your GHz router offers several benefits, including:
- Improved browsing speeds: By using faster and more reliable DNS servers, you can reduce latency and improve your overall browsing experience.
- Increased security: Configuring DNS server settings can help prevent domain name system (DNS) hijacking, which can redirect you to malicious websites or steal your private data.
- Enhanced network security: By configuring DNS filter settings, you can block access to malicious websites and protect your network from external threats.


![[Wireless Router] How to manually assign WAN DNS server to ASUS router?](https://4sysops.com/wp-content/uploads/2019/05/DNS-Servers.png "[Wireless Router] How to manually assign WAN DNS server to ASUS router?")


![Fix: DNS Server Not Responding in Windows 10 [WiFi Issue]](https://windowsbulletin.com/wp-content/uploads/2019/02/Google-Public-DNS.png "Fix: DNS Server Not Responding in Windows 10 [WiFi Issue]")


 - GeeksforGeeks")


 - GL.iNet Router Docs 4")