Configure Netgear Router As Access Point For Wi-Fi 6
Why Configure Your Netgear Router As Access Point For Wi-Fi 6?
Are you looking to expand your Wi-Fi coverage in your home or office? If so, setting up your Netgear router as an access point for Wi-Fi 6 can be a great solution. With a few simple steps, you can turn your Netgear device into an access point and extend connectivity to all the devices in your home or office. In this tutorial, we'll show you the detailed steps to set up your Netgear router as an access point for Wi-Fi 6.
Step 1: Locate the Ideal Position for Your Netgear Router
When setting up your Netgear router as an access point, it's essential to locate the ideal position to improve the wireless coverage of the existing network. The location depends on the layout of your home or office and the type of obstacles that may be in the way. Generally, the router should be placed in a central location to ensure maximum coverage. Avoid obstacles like walls, doors, and furniture, which can weaken the signal.
Step 2: Assign a Static IP Address to the Netgear Router
Before configuring your Netgear router as an access point, you need to assign a static IP address to it to avoid address conflicts on the network. To do this, connect to your router's configuration page using a computer connected to the router via a LAN cable. Log in to the admin page and go to the LAN settings section. Select the IP address of the router and enter a static IP address that is not already in use on the network.


 - YouTube")


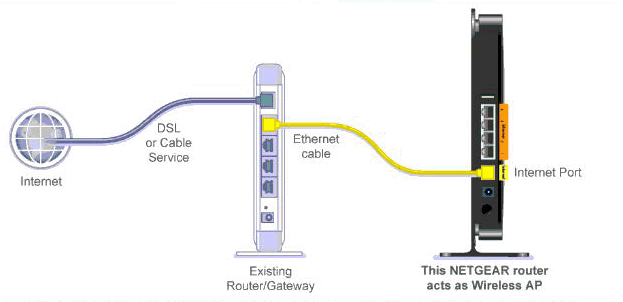
 as wireless access point")


- 3x1G Ports, Easy Setup, Security ...")

 WiFi 6 Router -Dual Band Gigabit Wireless Internet ...")


 Portable Mini Travel Wireless Pocket VPN WiFi ...")

